Craft Happy

Craft Happy's Summerville Location

Saturday, December 4, 2010

More Than Just a Fun Time: The Importance of Handcrafting

Hi All! And happy December. It's incredibly hard to believe 2010 is coming to an end, but here we are.

I just wanted to take a moment to talk about something near and dear to my heart (obviously)- handcrafting. Yes! We have fun teaching our sewing, knitting, and handcrafting classes to kids here at the studio. Summer Camps were an absolute blast this year- and Winter Break Camps are starting to fill up now too, we're so excited!

But handcrafting actually is an important and influential process in the growth of a child (and even you adults too). Here's an awesome list of all the benefits that come from allowing yourself time to create. I found this research on the website www.chooseart.com. It made me feel pretty great to know that our craft classes here at the studio help you do all of the following:

  • Heighten self-esteem
  • Develop problem-solving skills
  • Allow for expression and creativity
  • Improve visual discrimination skills
  • Develop self-discipline and responsibility
  • Increase motivation to learn
  • Provide fulfillment through productivity
  • Create cultural and historical awareness
  • Develop ability to make aesthetic judgments
So no need to buy all those gifts this holiday season. Take a little time for yourself this month and get crafty-- the benefits are pretty amazing!

Until next time-- See you next year!

Tuesday, November 9, 2010

Buy Local Month Launches November 15th!

Hello there, fellow crafty-person! And happy November to you!

November.... yikes.

If you haven't even begun to think about holiday shopping (guilty), don't despair! We've got a whole calendar full of fun classes and drop-in crafts available here at the Craft Happy studio. Even if you don't consider yourself a crafty person, we've got what it takes to walk you through the creative process, so you can give a gift this year that's truly handmade.

With the middle of November upon us also comes Buy Local Month! Did you know that every shop here in historic downtown Summerville is independently owned? Yup, we are. We're locals South Carolinians, just like you, and we wouldn't be here without you and your support.

Local businesses are the ones who donate to your schools, churches and charitable organizations. Just try looking for a large chainstore name at your next silent auction (you won't find one). What you will see are long lists of names of locally-owned businesses.

Also, 45% of everything you spend at a local business goes immediately back into your local economy- through taxes, local jobs, and local supplies. You are truly making a difference right here buy choosing to Buy Local!

We love being in downtown Summerville, and hope to see you this November and December as you choose to keep your money here in our economy.

** If you're like us, and want even more local savings, in both Summerville & all of Charleston, ask about the awesome new Buy Local card next time you're at the studio! Cha-Ching!

Friday, October 8, 2010

Sew Your Own Fabric Shopping Bags

1 Year Anniversary Party!

Hi all!
October is upon us, and we're celebrating our one year anniversary all month long! Thanks to you for your support- we wouldn't be here today without you.
We're also celebrating a worldwide event on Sunday, October 10th, and we wanted to invite you. That's right, 10/10/10.
10/10/10 is a worldwide call to action on the current global climate crisis. Thanks to organizations like 350.org, people all around the world will 'celebrate climate solutions and send... a clear message: "We're getting to work—what about you?"'
We at Craft Happy are sponsoring a totally free climate change event Sunday, October 10th from 1-4pm. You can come out to the Craft Happy sewing lounge and make your own reusable cloth shopping bags. We'll be supplying all materials and one-on-one instruction, and no previous sewing experience is needed!
Make Your Bag with Us!
One of our favorite things to do here is make MorsBags, reusable cloth shopping bags. MorsBags is another worldwide group, devoted to making- and counting- the number of reusable bags we all make. Each cloth bag made could potentially take away hundreds of plastic bags from our oceans and waterways. We'll be using the MorsBags bag pattern for our 10/10/10 sewing event.
So, what about you? Will we see you there?

Thursday, September 9, 2010

Sewing Basics: How to Sew on a Button

Hey there fellow crafters!

I thought this month we'd take it back, WAY back, back to the super-basics. Maybe it's the anticipation of fall, knowing school and classes have started, or maybe it's the fact that a lot of people seem to have a deep, dark secret that I can't help but share...

We have quite a few people- of all ages- confess to us that they don't know how to sew on a button.

Now this is silly (and maybe a little sad- you be the judge)- but never fear! Craft Happy is here! Here's our fail-safe tutorial about sewing on a button, so take heed, make notes, and practice practice, practice!

First, here is a list of things you will need to successfully put a button back on an article of clothing:

button-sewing tools
-sewing needle
-thread
-scissors
-button

cut that thread
Now that you've assembled all your necessary tools, the next step is to thread the needle. I like to cut a long piece of thread (around 16ish inches) and thread the needle with this.

Once the thread is through the eye of the needle, make the ends of your thread match. We're going to tie these into a knot!

(ok- you kids that I've taught in the past who somehow don't know how to tie a knot- pay special attention to this)

pull the thread ends to tighten
Take the two ends and wrap them around a finger (I choose to use my pinky finger). Work this little circle off the tip of your finger, and take the two ends and put them through the finger-circle you created. Pull. Ta Da! You have a knot. Do this multiple times (hopefully, in the same place) to make a nice fat knot. Trim the long ends (but don't cut TOO close to your knot!)

You are ready to sew!

line up your button with the button hole
At this point, we need to figure out where, exactly, your button needs to go. Place the button loop or button hole over the place where it would normally line up if buttoned shut. Take your needle and thread from the INSIDE of the garment and work at it until the needle is coming through the button hole in just the place you want it.

Now, move the button hole or loop out of your way. Grab that button and stick the needle through one of the holes. Go through another hole (from front to back), and then back from the outside of the garment to the inside, where you started. I try to aim the outgoing and ingoing needle/thread at the same place, so you aren't left with crazy stitches on the inside of your garment.

Sew through the holes of the buttons a few times, to make it very strong (we don't want to have to do this again soon, do we?).

Finally, tying the knot. Breathe deep, you're almost there.

put the thread through its own loop & pull
Finish on the inside of you garment. Take your needle and go back through the stitches you can see (and maybe a little bit of the garment fabric too), but instead of pulling tight, put your needle THROUGH the little circle you created when you put the needle through the stitches. Pull THIS tight. Hooray! At this point, you have a knot. Feel free to do this another time or two to make sure your button stays put.

Trim your thread, put your needle back in a safe place (like a pincushion), and enjoy! You've learned a basic sewing step. Thanks but no thanks, mom- I got this one from now on.

Ready to take your skills to the next level? Join us for a sewing class this fall! You're so ready.

Thursday, August 5, 2010

Sewing Vintage at Craft Happy

Hello fellow crafters!

We excited with all the sewing that's been going on here at Craft Happy this summer. If it's not Sewing Summer Camp for those 8 to 15, then it's Sewing 101 & Sewing 102 classes filling up with lovely ladies wanting to learn to sew. Pretty exciting stuff here at the studio!
Vintage Awesomeness

With sewing in mind (as always!), we're very happy to share the addition of beautiful, truly vintage patterns for sale now at the shop! Our vintage patterns range from the early 70s to the late 80s (a very exciting time in fashion!).

Whether it's a theme costume party (check out my vintage 60s pattern I purchased on Etsy and made into a fab dress for my "Mad Men" birthday party earlier this summer! My friend did too!), vintage patterns are a lot of fun to have and to create. Come on by and check them out sometime soon. (Worried about making your vintage pattern fit? Check out this handy website: Resizing Vintage Patterns.)

I love my vintage dress!
Now, if the thought of sewing from a pattern kind of makes you cringe- help is on the way! Starting with our fall class schedule in September, we'll be offering pattern-specific classes (and we can't wait!). Also joining the fall calendar are private lessons- bring in that pattern & fabric and let's make it happen together! We also have some beautiful Amy Butler patterns for sale now too (yay!), in case you can't wait until next month to get going.

Hope to see you here at the Craft Happy studio soon. We'll be here, crafting as usual. Stop on up!

Tuesday, June 8, 2010

Charity Event @ Craft Happy: Mors Bags

Hi all-

Summer is upon us, no?

I wanted to take our June blog to talk about another one of our monthly charity nights hosted here at the Craft Happy sewing lounge. The last Tuesday of every month, sewsters are welcome to use our machines and work tables to create their very own MorsBags.

And MorsBags are what, exactly?

So I (try to) never, ever go shopping without a sturdy canvas bag to cart home my goodies in. You don't go shopping without your wallet, right? Same goes for reusable shopping bags, which are totally the trend.

MorsBags is a worldwide organization dedicated to helping eradicate plastic shopping bags. Plastic bags practically never biodegrade, and with our proximity to water, often times they end up in the bellies of creatures we are working to protect (think of all those turtles and dolphins with a big ol' sad face!). MorsBags is one little way of giving a helping hand to the environment, and you look good while doing it too!

I recommend a little sewing experience if you want to join us for a Tuesday night MorsBag event, but the bag we're making is very, very simple, and super-chic. We have the pattern here at the studio, along with the MorsBags tag to make it official. Looking for fabric to bring to this event? I recommend bringing an old sheet to transform into a new, cool bag!

Want to read more about MorsBags and their worldwide mission? Check them out at http://www.morsbags.com/

As the Summerville chapter, you can help us add to our numbers every month! What are you waiting for? Join us!

Tuesday, May 4, 2010

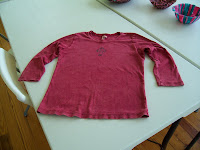
T-Shirt Makeover, Take 2!

Hi all!

We already have one fabulous T-Shirt Makeover class this month at Craft Happy,
but we couldn't help but pass along this other great way to reuse an old tee. So clean out your closet and join us as we make a T-Shirt Shrug!


Any tee will do for this project, ours happens to have three-quarter sleeves, but yours doesn't have to. If it has any images on it (like ours does), that's ok, but we are going to be cutting up the middle of the tee, so we recommend using a shirt that doesn't have any words on it.


Once you cut straight up the middle, go ahead and cut off the neck band too. Now, this may seem crazy, but we're going to sew a one inch casing all the way around these news cuts you've made. Remember to switch out your needle on your sewing machine (your manual can help you with this)- you'll need a needle that can sew through knits (it should look duller than your regular sewing machine needle, and may be colored differently too).

Once you've sewn your casing, take a long piece of ribbon and put a large safety pin through one end. Feed the safety-pin end of your ribbon through the casing (we had to fold our ribbon to make it fit, because he was so wide). Once you get through the casing to the other end, pull your ribbon. Your shirt should start to gather here! Pull until your ribbon ends are about the same length and your shirt is now a nice little gathered shrug. Put a little clear nail polish or fray check on the end of your ribbon, and enjoy your new fabulous shrug!


We always have fun sewing classes and events like this here at Craft Happy. Check out our online calendar, and be sure and join us this May!

Thursday, April 1, 2010

Chemo Caps at Craft Happy!

If you happen to drive by our shop on the first Tuesday night of each month, you'll see the lights on bright- that's because we're knitting up here! On our charity nights, Craft Happy opens it's door for a good cause. The first Tuesday of the month we devote to Chemo Caps, a worldwide organization with chapters, well, almost everywhere! We knit hats for local cancer patients, and once we have a basket full of cute, soft hats, we take them to the hospital and make a large donation. Want to join us? Grab your knitting, because we'd love to have you!


I often get asked about a hat pattern. There are a lot of patterns out there, some easier than others, but I'm here to tell you-- Yes, you CAN knit a hat without using circular needles, and I'll show you how! This is my easy-breezy hat pattern, cobbled together from several patterns I've run into through the years. This is my go-to pattern: to complete this hat all you need to know how to do is knit, purl, increase and decrease, and you, yes, you, can knit a Chemo Cap and help give back to our community!

First, choose a soft yarn (the more natural the fibers, the better). I usually start with size 10 needles, but use whatever size seems to work best with your yarn of choice.

Cast on between 42-50 stitches. This hat is going to fit a regular-sized head. Of course, you can go fewer or more stitches, depending on the final size you want to achieve.

Knit one, purl one for about 8 rows, or until the band measures about 2 inches wide.

Once the band is the width you want, we will begin the cap portion, beginning by knitting 5, increase by 1, knitting 5, increase by 1, all the way across.

Purl the next entire row.

Here's where we begin the stockinette stitch (knit one row, purl one row), until the cap portion is again about 3 inches.

Now we begin decreasing! Knit 5, decrease by 1, all the way across.

Purl the next row.

Knit 4, decrease by 1, all the way across.

Purl.

Knit 3, decrease by 1, all the way across.

Purl.

Knit 2, decrease by 1, all the way across.

Purl.

Knit 1, decrease by 1, all the way across.

Purl. Cut a long tail when you get to the end here. Thread that tail into your darning needle, and put the needle through the remaining stitches you have left on your needle. Pull the thread tight, taking the stitches off your needle, and you should have the top of the cap all done!

Sew down the side of the cap (wrong-side out) and weave in the ends. Turn your cap right-side out and marvel at your new hat!

Feel ready to make your first easy hat? Join Craft Happy the first Tuesday night of every month for Chemo Caps, and help us give back to our community. We start around 6:30pm and knit until whenever. We absolutely can't wait to have you here!

Friday, February 5, 2010

Kids Sewing and Knitting Classes join the calendar!

Hello fellow-crafters!

Wow, what a beginning to 2010! ReNew Year is off to a great start, Knitting 101 is filling up, and we've been staying warm and dry in our downtown shop! Crafting and creativity never take a break here at Craft Happy, even if it's cold and rainy out.

We wanted to let the blogosphere know about some fun upcoming crafting classes, geared specifically for kids! We here at Craft Happy have had a huge amount of requests for kid-specific sewing classes and knitting classes. Well, you asked for it, and you got it!Our very first Kids Sewing Class takes place this month, on Saturday morning, February 27th. This class is for those aged 7 to 14 who want to learn how to use a sewing machine, and you will create your very own purse in this class!


We are also offering a Kids Knitting Class on Saturday, March 6th. Taking a shower is more fun when you can use washcloths that YOU made! This class is for ages 7-14, and you will take home your own set of washcloths and knitting needles at the end of this session (too fun!).

We will also have one more Kids Sewing Class later in March, and we'll be making our own craft apron in that class. It's sure to be a blast!

In fact, we're having so much fun crafting with kids that Craft Happy will be offering week-long Sewing Summer Camps and Crafting Summer Camps in June, July, and August. More on that once March rolls around (it'll be here before you know it)!

If your kids are looking for a fun way to spend their after-school time, Craft Happy also offers After Class Crafts every Tuesday, Wednesday, and Thursday afternoon. We make a lot of fun stuff that is finished and ready to take home at the end of each session. We'd love for you to join us!

Looking for a specific class? Let us know! The more we hear from you, the more we can tailor our calendar to suit your needs and crafting desires. Ooh yeah.

Stop by our shop and see the new Spring merchandise we just got in (super-cute!). And all knitted goods are 50% off in our Sick-Of-Winter Sale. Check it out next time you swing through downtown!

See something you like? Sign up for classes online here. Or you can always give us a call! 261.7704

Until next time, stay warm AND crafty!

Tuesday, January 5, 2010

Happy Re-New Year!

Hello fellow crafters! Welcome to 2010!

If you're anything like the crew here at Craft Happy, then you know the after-holiday time is the perfect (i.e. necessary) time to clean out some closet space. Out with the old, in with the new, right?

For those of you who hate to part with anything, no matter how old or, ahem, unstylish, Craft Happy is here to help! This month we take something old (a wool sweater), and magically (ok, not so magically), repurpose the pieces to create something new and cool and totally usable again.

Here's our old sweater:

It's kind of ehh, right? But it's got potential, and it is 100% wool, so we felted it down (cold water, detergent, a washing machine, check out October blog for more felting details) and now we can have our way with it, craft-wise.

First we made some measurements and decided this old sweater could become a cute mini-cardigan with just a little work. Off goes five inches from the bottom- but don't throw that away, we can use that later!

We also are trimming the sleeves to a three-quarter length, making this bulky sweater ready for a new sassy life.
The ends of the sleeves won't unravel (because of the felting), but they look a little unfinished. Needle-felting to the rescue! With a little wool roving, we add a simple embellishment around the edges that matches the neck line (nice, huh?).

Mini-cardi is complete and ready to begin it's new life as a welcome member of your closet!
The cut-off end of the sweater is long enough to become an ultra-warm scarf. Just add a button hole and a large button and you're set!
The sleeve ends are sewn a wee bit around the thumb-area to make matching fingerless gloves. Sweater, you have a new life (or, lives) in 2010!

Projects like this we call 'ReNew Year.' 'ReNew Year' is an ongoing craft class here at Craft Happy; check out our online calendar for more info about upcoming craft classes! Join us and get Craft Happy in 2010!